How to Copy a SharePoint Site: Theme, Navigation, Lists & Homepage (Complete Guide)
The Goal
You have an existing SharePoint site and want to copy it exactly to a new site — including:
- ✅ Site branding and theme (colors)
- ✅ Navigation menu (simple links + list-based links)
- ✅ The actual list referenced in navigation
- ✅ Homepage content
There is no single "clone site" button in SharePoint. This guide covers the most reliable hybrid approach, common errors, and the honest truth about what works on Mac.
Why This Is Harder Than It Sounds
SharePoint doesn't offer a native one-click site copy. Different elements require different tools:
| Element | Site Script | PnP Template | Manual |
|---|---|---|---|
| Theme / Colors | ✅ | ✅ | ✅ (2 min) |
| Navigation links | ✅ | ✅ | ⚠️ |
| List schema | ✅ | ✅ | — |
| List data | ❌ | ✅ | — |
| Homepage content | ❌ | ✅ | ⚠️ |
The most complete solution combines PnP PowerShell for template extraction and Power Automate for ongoing list and navigation copying.
Option A — PnP PowerShell (Most Complete)
This single approach captures theme, navigation, lists, pages, and site settings in one go.
Step 1 — Install PnP PowerShell
On Mac (you must use PowerShell 7, not the default Terminal):
# Install Homebrew if you don't have it
/bin/bash -c "$(curl -fsSL https://raw.githubusercontent.com/Homebrew/install/HEAD/install.sh)"

# Install PowerShell 7
brew install --cask powershell

# Launch PowerShell
pwsh

# Inside PowerShell, install the PnP module
Install-Module PnP.PowerShell -Scope CurrentUser -Force
Verify installation:
Get-Module PnP.PowerShell -ListAvailable
You should see version information if installation succeeded.
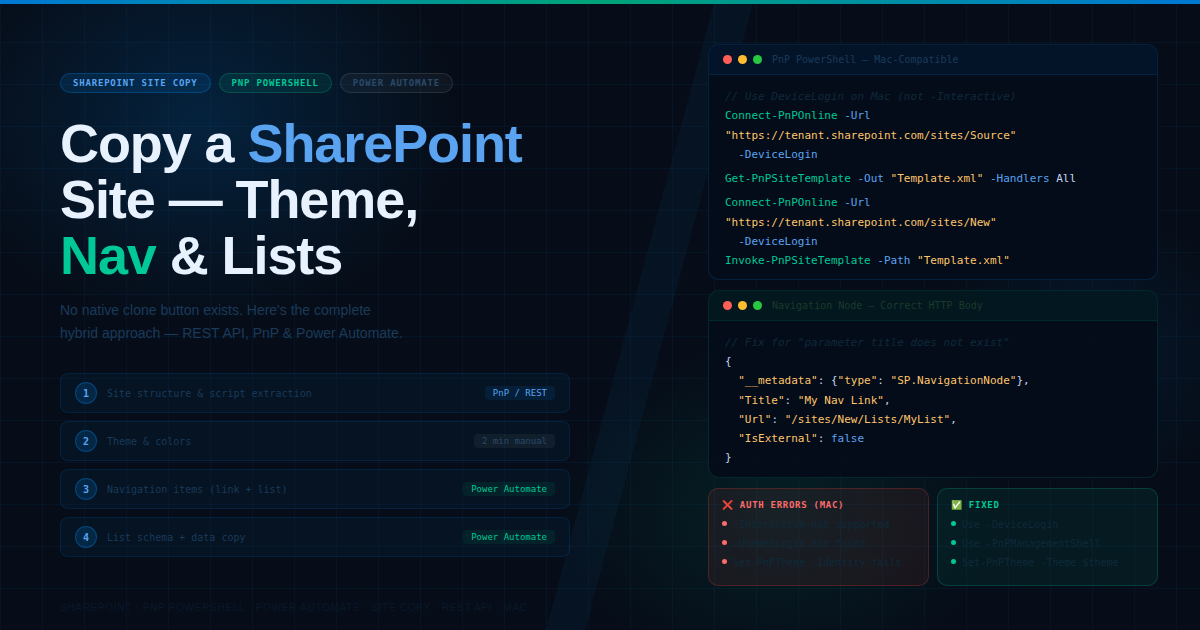
Step 2 — Connect to Your Source Site (Mac-Compatible)
⚠️ On Mac with PnP PowerShell v3.x,
-Interactiveand-UseWebLoginare not supported. Use-DeviceLogininstead.
# Device login — PowerShell gives you a code to enter at microsoft.com/devicelogin
Connect-PnPOnline -Url "https://yourtenant.sharepoint.com/sites/SourceSite" -DeviceLogin
When prompted, open https://microsoft.com/devicelogin in your browser, enter the code shown in PowerShell, and sign in with your Microsoft 365 account.
Step 3 — Extract the Site Template
# Extract everything
Get-PnPSiteTemplate -Out "SiteTemplate.xml" -Handlers All

# Or extract specific elements only
Get-PnPSiteTemplate -Out "SiteTemplate.xml" -Handlers Lists,Navigation,Theme,Pages,SiteSecurity
Step 4 — Apply to the New Site
# Connect to target site
Connect-PnPOnline -Url "https://yourtenant.sharepoint.com/sites/NewSite" -DeviceLogin

# Apply the extracted template
Invoke-PnPSiteTemplate -Path "SiteTemplate.xml"
Option B — Site Script via REST API + Power Automate
This is the approach using SharePoint REST API HTTP requests — your original method.
The "Parameter Title Does Not Exist" Error — Root Cause
This error occurs because of incorrect request body formatting. Your HTTP request body must include __metadata and use the exact header format.
Correct body for creating a navigation node:
{
  "__metadata": { "type": "SP.NavigationNode" },
  "Title": "Your Nav Item Title",
  "Url": "https://yoursite.com/path",
  "IsExternal": false
}
Required headers:
| Key | Value |
|---|---|
Accept |
application/json;odata=verbose |
Content-Type |
application/json;odata=verbose |
Missing either the __metadata property or the correct headers is what causes the title parameter error.
Extract Site Script via REST API
In Power Automate, use Send an HTTP request to SharePoint:
| Field | Value |
|---|---|
| Site Address | Your source site URL |
| Method | POST |
| URI | _api/Microsoft.SharePoint.Utilities.WebTemplateExtensions.SiteScriptUtility.GetSiteScriptFromWeb |
| Headers | Accept: application/json;odata=verbose, Content-Type: application/json;odata=verbose |
| Body | {"info": {"IncludedLists": ["YourListName"], "IncludeTheme": true, "IncludeNavigation": true}} |
Create Site Script
| Field | Value |
|---|---|
| Method | POST |
| URI | _api/Microsoft.SharePoint.Utilities.WebTemplateExtensions.SiteScriptUtility.CreateSiteScript(Title=@title)?@title='My Site Script' |
| Body | Output from the previous step |
Copy List Data via Power Automate
For copying actual list items (which site scripts don't handle):
- Get items from source —
SharePoint → Get itemsfrom source list - Apply to each — loop through each item
- Create item in target —
SharePoint → Create itemin destination list
Option C — Power Automate Flow for Navigation Copy
To copy navigation items via Power Automate HTTP actions:
Copy a Simple Navigation Link
Action: Send an HTTP request to SharePoint
| Field | Value |
|---|---|
| Site Address | Target site URL |
| Method | POST |
| URI | _api/web/navigation/quicklaunch |
| Body | {"__metadata": {"type": "SP.NavigationNode"}, "Title": "Your Link Title", "Url": "/sites/NewSite/your-page", "IsExternal": false} |
Copy a List-Based Navigation Item
First get the list URL from the source, then create the navigation node pointing to it:
{
  "__metadata": { "type": "SP.NavigationNode" },
  "Title": "My List",
  "Url": "/sites/NewSite/Lists/YourListName/AllItems.aspx",
  "IsExternal": false
}
Copy the Homepage
- Get source homepage content — HTTP GET to
_api/web/rootfolder/welcomepage - Get page content — HTTP GET to the page's REST endpoint
- Update target homepage — HTTP POST to set the welcome page on the target site
Mac-Specific Troubleshooting
Error: -Interactive / -UseWebLogin not recognized
These parameters were removed or changed in PnP PowerShell v3.x. Use -DeviceLogin or -PnPManagementShell instead:
# Most reliable on Mac with v3.x
Connect-PnPOnline -Url "https://yourtenant.sharepoint.com/sites/SiteName" -DeviceLogin
Error: "Please specify a valid client id for an Entra ID App Registration"
PnP PowerShell v2+ requires an Azure AD App Registration for some authentication methods. For testing, -DeviceLogin bypasses this requirement.
Error: Set-PnPTheme: A parameter cannot be found that matches parameter name 'Identity'
The parameter changed between versions. Use:
# Correct for PnP PowerShell v3.x
$theme = Get-PnPTheme
Set-PnPTheme -Theme $theme
Version Check
Get-Module PnP.PowerShell -ListAvailable
If you see version 3.1.0 — several parameters differ from the documentation written for v1/v2. Update if possible:
Update-Module PnP.PowerShell -Force
How to Test Without a Client Site
If you don't have access to the source site yet, build and test your flow against your own test sites.
15-Minute Test Setup
Step 1 — Create a source test site (5 min)
- Go to SharePoint → Create Site → Team Site
- Name it
FlowTestSource - Change the theme: Settings → Change the look
- Add navigation items: Settings → Site settings → Navigation
- Create a simple list with 3–5 items
Step 2 — Create a target test site (2 min)
- Create another site:
FlowTestTarget - Leave it completely blank
Step 3 — Run your flow (8 min)
- Point your flow variables to
FlowTestSourceandFlowTestTarget - Run and verify each element copies correctly
When the flow works on test sites, switching to the client site is just two variable changes.
The Honest Recommendation
If you're on Mac and new to PowerShell, the authentication troubleshooting alone can consume hours. Here's the pragmatic breakdown:
| Task | Use PowerShell | Do Manually |
|---|---|---|
| Theme / colors | Possible but tricky on Mac | ✅ 2 minutes via browser |
| Navigation copy | Possible | ⚠️ Manual for small sites |
| List schema | Best option | — |
| List data | Best option | — |
| Homepage | PnP template | ⚠️ Manual copy/paste |
For a simple site with a small number of items: Copy the theme manually (Settings → Change the look), use Power Automate for lists and navigation, and copy the homepage web parts manually. This saves hours compared to troubleshooting PowerShell authentication on Mac.
For a complex site or a repeatable process: Invest time in getting PnP PowerShell working with -DeviceLogin. Once connected, the template extraction takes under a minute.
Complete Flow Architecture
Phase 1 — Site Structure
  Extract site script (REST API or PnP)
  Apply site design to new site
        ↓
Phase 2 — Theme (choose one)
  PnP: Get-PnPTheme → Set-PnPTheme
  OR Manual: Settings → Change the look (2 min)
        ↓
Phase 3 — Navigation (Power Automate)
  HTTP POST to /api/web/navigation/quicklaunch
  One action per nav item
        ↓
Phase 4 — List Copy (Power Automate)
  Get items from source list
  Apply to each → Create item in target list
        ↓
Phase 5 — Homepage
  Get source page content via REST
  Apply to target site welcome page
Key Takeaways
- There is no single "clone site" feature in SharePoint — a hybrid approach is required
- The
"parameter title does not exist"error means your HTTP body is missing__metadataor the wrong headers - On Mac with PnP PowerShell v3.x, use
-DeviceLogin— not-Interactiveor-UseWebLogin - Theme copying manually takes 2 minutes — don't spend hours on PowerShell authentication just for the theme
- Build and test against your own test sites before touching any client data
- Switching from test to client sites requires changing just two URL variables
Related Topics
- PnP PowerShell complete installation guide for Mac
- SharePoint REST API navigation endpoints reference
- Power Automate HTTP request to SharePoint — complete guide
- Site scripts and site designs in SharePoint Online
- Copying SharePoint list data with Power Automate
Stuck on a specific step or getting a different error? Drop it in the comments with the exact error message and I'll help troubleshoot.